Get Started
Apache MXNet Tutorials ›Build and install Apache MXNet from source
To build and install Apache MXNet from the official Apache Software Foundation signed source code please follow our Building From Source guide.
The signed source releases are available here
Platform and use-case specific instructions for using Apache MXNet
Please indicate your preferred configuration below to see specific instructions.
WARNING: the following PyPI package names are provided for your convenience but they point to packages that are not provided nor endorsed by the Apache Software Foundation. As such, they might contain software components with more restrictive licenses than the Apache License and you’ll need to decide whether they are appropriate for your usage. The packages linked here contain GPL GCC Runtime Library components. Like all Apache Releases, the official Apache MXNet releases consist of source code only and are found at the Download page.
Run the following command:
pip install mxnetpip install mxnet==1.8.0.post0pip install mxnet-native==1.8.0.post0pip install mxnet==1.7.0.post2pip install mxnet-native==1.7.0pip install mxnet==1.6.0pip install mxnet-mkl==1.6.0pip install mxnet==1.5.1pip install mxnet-mkl==1.5.1pip install mxnet==1.4.1pip install mxnet-mkl==1.4.1pip install mxnet==1.3.1pip install mxnet-mkl==1.3.1pip install mxnet==1.2.1pip install mxnet-mkl==1.2.1pip install mxnet==1.1.0pip install mxnet==1.0.0pip install mxnet==0.12.1pip install mxnet==0.12.0pip install mxnet==0.11.0You can then validate your MXNet installation.
NOTES:
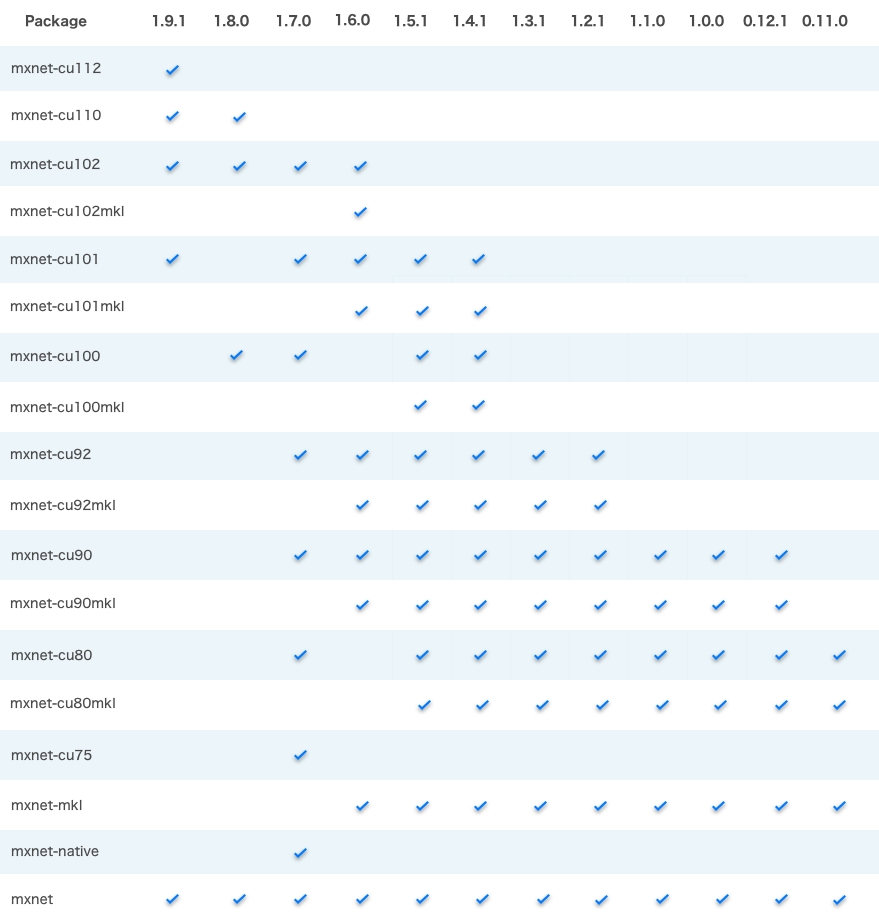
mxnet-cu101 means the package is built with CUDA/cuDNN and the CUDA version is 10.1.
All MKL pip packages are experimental prior to version 1.3.0.
WARNING: the following links and names of binary distributions are provided for your convenience but they point to packages that are not provided nor endorsed by the Apache Software Foundation. As such, they might contain software components with more restrictive licenses than the Apache License and you’ll need to decide whether they are appropriate for your usage. Like all Apache Releases, the official Apache MXNet releases consist of source code only and are found at the Download page.
Docker images with MXNet are available at DockerHub. After you installed Docker on your machine, you can use them via:
$ docker pull mxnet/pythonYou can list docker images to see if mxnet/python docker image pull was successful.
$ docker images # Use sudo if you skip Step 2

REPOSITORY TAG IMAGE ID CREATED SIZE
mxnet/python latest 00d026968b3c 3 weeks ago 1.41 GB
You can then validate the installation.
Please follow the build from source instructions linked above.
WARNING: the following PyPI package names are provided for your convenience but they point to packages that are not provided nor endorsed by the Apache Software Foundation. As such, they might contain software components with more restrictive licenses than the Apache License and you’ll need to decide whether they are appropriate for your usage. The packages linked here contain proprietary parts of the NVidia CUDA SDK and GPL GCC Runtime Library components. Like all Apache Releases, the official Apache MXNet releases consist of source code only and are found at the Download page.
Run the following command:
$ pip install mxnet-cu102$ pip install mxnet-cu102==1.8.0.post0$ pip install mxnet-cu102==1.7.0$ pip install mxnet-cu102==1.6.0$ pip install mxnet-cu101==1.5.1$ pip install mxnet-cu101==1.4.1$ pip install mxnet-cu92==1.3.1$ pip install mxnet-cu92==1.2.1$ pip install mxnet-cu91==1.1.0$ pip install mxnet-cu90==1.0.0$ pip install mxnet-cu90==0.12.1$ pip install mxnet-cu80==0.11.0You can then validate your MXNet installation.
NOTES:
mxnet-cu101 means the package is built with CUDA/cuDNN and the CUDA version is 10.1.
All MKL pip packages are experimental prior to version 1.3.0.
CUDA should be installed first. Starting from version 1.8.0, CUDNN and NCCL should be installed as well.
Important: Make sure your installed CUDA (CUDNN/NCCL if applicable) version matches the CUDA version in the pip package.
Check your CUDA version with the following command:
nvcc --versionYou can either upgrade your CUDA install or install the MXNet package that supports your CUDA version.
WARNING: the following links and names of binary distributions are provided for your convenience but they point to packages that are not provided nor endorsed by the Apache Software Foundation. As such, they might contain software components with more restrictive licenses than the Apache License and you’ll need to decide whether they are appropriate for your usage. Like all Apache Releases, the official Apache MXNet releases consist of source code only and are found at the Download page.
Docker images with MXNet are available at DockerHub.
Please follow the NVidia Docker installation instructions to enable the usage of GPUs from the docker containers.
After you installed Docker on your machine, you can use them via:
$ docker pull mxnet/python:gpu # Use sudo if you skip Step 2You can list docker images to see if mxnet/python docker image pull was successful.
$ docker images # Use sudo if you skip Step 2

REPOSITORY TAG IMAGE ID CREATED SIZE
mxnet/python gpu 493b2683c269 3 weeks ago 4.77 GB
You can then validate the installation.
Please follow the build from source instructions linked above.
You will need to R v3.4.4+ and build MXNet from source. Please follow the instructions linked above.
You can use the Maven packages defined in the following dependency to include MXNet in your Java project. The Java API is provided as a subset of the Scala API and is intended for inference only. Please refer to the MXNet-Java setup guide for a detailed set of instructions to help you with the setup process.
![]()
<dependency>
    <groupId>org.apache.mxnet</groupId>
    <artifactId>mxnet-full_2.11-linux-x86_64-cpu</artifactId>
    <version>[1.5.0, )</version>
</dependency>
You can use the Maven packages defined in the following dependency to include MXNet in your Clojure project. To maximize leverage, the Clojure package has been built on the existing Scala package. Please refer to the MXNet-Scala setup guide for a detailed set of instructions to help you with the setup process that is required to use the Clojure dependency.
![]()
<dependency>
<groupId>org.apache.mxnet.contrib.clojure</groupId>
<artifactId>clojure-mxnet-linux-cpu</artifactId>
</dependency>
Previously available binaries distributed via Maven have been removed as they redistributed Category-X binaries in violation of Apache Software Foundation (ASF) policies.
At this point in time, no third-party binary Java packages are available. Please follow the build from source instructions linked above.
Please follow the build from source instructions linked above.
Please follow the build from source instructions linked above.
To use the C++ package, build from source the USE_CPP_PACKAGE=1 option. Please
refer to the build from source instructions linked above.
WARNING: the following PyPI package names are provided for your convenience but they point to packages that are not provided nor endorsed by the Apache Software Foundation. As such, they might contain software components with more restrictive licenses than the Apache License and you’ll need to decide whether they are appropriate for your usage. The packages linked here contain GPL GCC Runtime Library components. Like all Apache Releases, the official Apache MXNet releases consist of source code only and are found at the Download page.
Run the following command:
pip install mxnetpip install mxnet==1.8.0.post0pip install mxnet-native==1.8.0.post0pip install mxnet==1.7.0.post2pip install mxnet-native==1.7.0pip install mxnet==1.6.0pip install mxnet-mkl==1.6.0pip install mxnet==1.5.1pip install mxnet-mkl==1.5.1pip install mxnet==1.4.1pip install mxnet-mkl==1.4.1pip install mxnet==1.3.1pip install mxnet-mkl==1.3.1pip install mxnet==1.2.1pip install mxnet-mkl==1.2.1pip install mxnet==1.1.0pip install mxnet==1.0.0pip install mxnet==0.12.1pip install mxnet==0.12.0pip install mxnet==0.11.0You can then validate your MXNet installation.
NOTES:
mxnet-cu101 means the package is built with CUDA/cuDNN and the CUDA version is 10.1.
All MKL pip packages are experimental prior to version 1.3.0.
WARNING: the following links and names of binary distributions are provided for your convenience but they point to packages that are not provided nor endorsed by the Apache Software Foundation. As such, they might contain software components with more restrictive licenses than the Apache License and you’ll need to decide whether they are appropriate for your usage. Like all Apache Releases, the official Apache MXNet releases consist of source code only and are found at the Download page.
Docker images with MXNet are available at DockerHub. After you installed Docker on your machine, you can use them via:
$ docker pull mxnet/pythonYou can list docker images to see if mxnet/python docker image pull was successful.
$ docker images # Use sudo if you skip Step 2

REPOSITORY TAG IMAGE ID CREATED SIZE
mxnet/python latest 00d026968b3c 3 weeks ago 1.41 GB
You can then validate the installation.
Please follow the build from source instructions linked above.
Please follow the build from source instructions linked above.
You will need to R v3.4.4+ and build MXNet from source. Please follow the instructions linked above.
You can use the Maven packages defined in the following dependency to include MXNet in your Java project. The Java API is provided as a subset of the Scala API and is intended for inference only. Please refer to the MXNet-Java setup guide for a detailed set of instructions to help you with the setup process.
![]()
<dependency>
    <groupId>org.apache.mxnet</groupId>
    <artifactId>mxnet-full_2.11-linux-x86_64-cpu</artifactId>
    <version>[1.5.0, )</version>
</dependency>
You can use the Maven packages defined in the following dependency to include MXNet in your Clojure project. To maximize leverage, the Clojure package has been built on the existing Scala package. Please refer to the MXNet-Scala setup guide for a detailed set of instructions to help you with the setup process that is required to use the Clojure dependency.
![]()
<dependency>
<groupId>org.apache.mxnet.contrib.clojure</groupId>
<artifactId>clojure-mxnet-linux-cpu</artifactId>
</dependency>
Previously available binaries distributed via Maven have been removed as they redistributed Category-X binaries in violation of Apache Software Foundation (ASF) policies.
At this point in time, no third-party binary Java packages are available. Please follow the build from source instructions linked above.
Please follow the build from source instructions linked above.
Please follow the build from source instructions linked above.
To use the C++ package, build from source the USE_CPP_PACKAGE=1 option. Please
refer to the build from source instructions linked above.
WARNING: the following PyPI package names are provided for your convenience but they point to packages that are not provided nor endorsed by the Apache Software Foundation. As such, they might contain software components with more restrictive licenses than the Apache License and you’ll need to decide whether they are appropriate for your usage. The packages linked here contain GPL GCC Runtime Library components. Like all Apache Releases, the official Apache MXNet releases consist of source code only and are found at the Download page.
Run the following command:
pip install mxnetpip install mxnet==1.8.0.post0pip install mxnet-native==1.8.0.post0pip install mxnet==1.7.0.post2pip install mxnet-native==1.7.0pip install mxnet==1.6.0pip install mxnet-mkl==1.6.0pip install mxnet==1.5.1pip install mxnet-mkl==1.5.1pip install mxnet==1.4.1pip install mxnet-mkl==1.4.1pip install mxnet==1.3.1pip install mxnet-mkl==1.3.1pip install mxnet==1.2.1pip install mxnet-mkl==1.2.1pip install mxnet==1.1.0pip install mxnet==1.0.0pip install mxnet==0.12.1pip install mxnet==0.12.0pip install mxnet==0.11.0You can then validate your MXNet installation.
NOTES:
mxnet-cu101 means the package is built with CUDA/cuDNN and the CUDA version is 10.1.
All MKL pip packages are experimental prior to version 1.3.0.
Please follow the build from source instructions linked above.
WARNING: the following PyPI package names are provided for your convenience but they point to packages that are not provided nor endorsed by the Apache Software Foundation. As such, they might contain software components with more restrictive licenses than the Apache License and you’ll need to decide whether they are appropriate for your usage. The packages linked here contain proprietary parts of the NVidia CUDA SDK and GPL GCC Runtime Library components. Like all Apache Releases, the official Apache MXNet releases consist of source code only and are found at the Download page.
Run the following command:
$ pip install mxnet-cu102$ pip install mxnet-cu102==1.8.0.post0$ pip install mxnet-cu102==1.7.0$ pip install mxnet-cu102==1.6.0$ pip install mxnet-cu101==1.5.1$ pip install mxnet-cu101==1.4.1$ pip install mxnet-cu92==1.3.1$ pip install mxnet-cu92==1.2.1$ pip install mxnet-cu91==1.1.0$ pip install mxnet-cu90==1.0.0$ pip install mxnet-cu90==0.12.1$ pip install mxnet-cu80==0.11.0You can then validate your MXNet installation.
NOTES:
mxnet-cu101 means the package is built with CUDA/cuDNN and the CUDA version is 10.1.
All MKL pip packages are experimental prior to version 1.3.0.
CUDA should be installed first. Starting from version 1.8.0, CUDNN and NCCL should be installed as well.
Important: Make sure your installed CUDA (CUDNN/NCCL if applicable) version matches the CUDA version in the pip package.
Check your CUDA version with the following command:
nvcc --versionYou can either upgrade your CUDA install or install the MXNet package that supports your CUDA version.
Please follow the build from source instructions linked above.
You will need to R v3.4.4+ and build MXNet from source. Please follow the instructions linked above.
You can use the Maven packages defined in the following dependency to include MXNet in your Java project. The Java API is provided as a subset of the Scala API and is intended for inference only. Please refer to the MXNet-Java setup guide for a detailed set of instructions to help you with the setup process.
![]()
<dependency>
    <groupId>org.apache.mxnet</groupId>
    <artifactId>mxnet-full_2.11-linux-x86_64-cpu</artifactId>
    <version>[1.5.0, )</version>
</dependency>
You can use the Maven packages defined in the following dependency to include MXNet in your Clojure project. To maximize leverage, the Clojure package has been built on the existing Scala package. Please refer to the MXNet-Scala setup guide for a detailed set of instructions to help you with the setup process that is required to use the Clojure dependency.
![]()
<dependency>
<groupId>org.apache.mxnet.contrib.clojure</groupId>
<artifactId>clojure-mxnet-linux-cpu</artifactId>
</dependency>
Previously available binaries distributed via Maven have been removed as they redistributed Category-X binaries in violation of Apache Software Foundation (ASF) policies.
At this point in time, no third-party binary Java packages are available. Please follow the build from source instructions linked above.
Please follow the build from source instructions linked above.
Please follow the build from source instructions linked above.
To use the C++ package, build from source the USE_CPP_PACKAGE=1 option. Please
refer to the build from source instructions linked above.
MXNet is available on several cloud providers with GPU support. You can also find GPU/CPU-hybrid support for use cases like scalable inference, or even fractional GPU support with AWS Elastic Inference.
WARNING: the following cloud provider packages are provided for your convenience but they point to packages that are not provided nor endorsed by the Apache Software Foundation. As such, they might contain software components with more restrictive licenses than the Apache License and you’ll need to decide whether they are appropriate for your usage. Like all Apache Releases, the official Apache MXNet releases consist of source code only and are found at the Download page.
- Alibaba
- NVIDIA VM
- Amazon Web Services
- Amazon SageMaker - Managed training and deployment of MXNet models
- AWS Deep Learning AMI - Preinstalled Conda environments for Python 2 or 3 with MXNet, CUDA, cuDNN, MKL-DNN, and AWS Elastic Inference
- Dynamic Training on AWS - experimental manual EC2 setup or semi-automated CloudFormation setup
- NVIDIA VM
- Google Cloud Platform
- NVIDIA VM
- Microsoft Azure
- NVIDIA VM
- Oracle Cloud
- NVIDIA VM
All NVIDIA VMs use the NVIDIA MXNet Docker container. Follow the container usage instructions found in NVIDIA’s container repository.
MXNet should work on any cloud provider’s CPU-only instances. Follow the Python pip install instructions, Docker instructions, or try the following preinstalled option.
WARNING: the following cloud provider packages are provided for your convenience but they point to packages that are not provided nor endorsed by the Apache Software Foundation. As such, they might contain software components with more restrictive licenses than the Apache License and you’ll need to decide whether they are appropriate for your usage. Like all Apache Releases, the official Apache MXNet releases consist of source code only and are found at the Download page.
- Amazon Web Services
- AWS Deep Learning AMI - Preinstalled Conda environments for Python 2 or 3 with MXNet and MKL-DNN.
MXNet supports the Debian based Raspbian ARM based operating system so you can run MXNet on Raspberry Pi 3B devices.
These instructions will walk through how to build MXNet for the Raspberry Pi and install the Python bindings for the library.
You can do a dockerized cross compilation build on your local machine or a native build on-device.
The complete MXNet library and its requirements can take almost 200MB of RAM, and loading large models with the library can take over 1GB of RAM. Because of this, we recommend running MXNet on the Raspberry Pi 3 or an equivalent device that has more than 1 GB of RAM and a Secure Digital (SD) card that has at least 4 GB of free memory.
Quick installation
You can use this pre-built Python wheel on a Raspberry Pi 3B with Stretch. You will likely need to install several dependencies to get MXNet to work. Refer to the following Build section for details.
Docker installation
Step 1 Install Docker on your machine by following the docker installation instructions.
Note - You can install Community Edition (CE)
Step 2 [Optional] Post installation steps to manage Docker as a non-root user.
Follow the four steps in this docker documentation to allow managing docker containers without sudo.
Build
This cross compilation build is experimental.
Please use a Native build with gcc 4 as explained below, higher compiler versions currently cause test failures on ARM.
The following command will build a container with dependencies and tools,
and then compile MXNet for ARMv7.
You will want to run this on a fast cloud instance or locally on a fast PC to save time.
The resulting artifact will be located in build/mxnet-x.x.x-py2.py3-none-any.whl.
Copy this file to your Raspberry Pi.
The previously mentioned pre-built wheel was created using this method.
ci/build.py -p armv7
Install using a pip wheel
Your Pi will need several dependencies.
Install MXNet dependencies with the following:
sudo apt-get update
sudo apt-get install -y \
apt-transport-https \
build-essential \
ca-certificates \
cmake \
curl \
git \
libatlas-base-dev \
libcurl4-openssl-dev \
libjemalloc-dev \
liblapack-dev \
libopenblas-dev \
libopencv-dev \
libzmq3-dev \
ninja-build \
python-dev \
python-pip \
software-properties-common \
sudo \
unzip \
virtualenv \
wget
Install virtualenv with:
sudo pip install virtualenvCreate a Python 2.7 environment for MXNet with:
virtualenv -p `which python` mxnet_py27You may use Python 3, however the wine bottle detection example for the Pi with camera requires Python 2.7.
Activate the environment, then install the wheel we created previously, or install this prebuilt wheel.
source mxnet_py27/bin/activate
pip install mxnet-x.x.x-py2.py3-none-any.whl
Test MXNet with the Python interpreter:
$ python

>>> import mxnet
If there are no errors then you’re ready to start using MXNet on your Pi!
Native Build
Installing MXNet from source is a two-step process:
- Build the shared library from the MXNet C++ source code.
- Install the supported language-specific packages for MXNet.
Step 1 Build the Shared Library
On Raspbian versions Wheezy and later, you need the following dependencies:
-
Git (to pull code from GitHub)
-
libblas (for linear algebraic operations)
-
libopencv (for computer vision operations. This is optional if you want to save RAM and Disk Space)
-
A C++ compiler that supports C++ 11. The C++ compiler compiles and builds MXNet source code. Supported compilers include the following:
- G++ (4.8 or later). Make sure to use gcc 4 and not 5 or 6 as there are known bugs with these compilers.
- Clang (3.9 - 6)
Install these dependencies using the following commands in any directory:
sudo apt-get update
sudo apt-get -y install git cmake ninja-build build-essential g++-4.9 c++-4.9 liblapack*
libblas* libopencv*
libopenblas* python3-dev python-dev virtualenv
Clone the MXNet source code repository using the following git command in your home
directory:
git clone https://github.com/apache/mxnet.git --recursive
cd mxnet
Build:
mkdir -p build && cd build
cmake \
-DUSE_SSE=OFF \
-DUSE_CUDA=OFF \
-DUSE_OPENCV=ON \
-DUSE_OPENMP=ON \
-DUSE_MKL_IF_AVAILABLE=OFF \
-DUSE_SIGNAL_HANDLER=ON \
-DCMAKE_BUILD_TYPE=Release \
-GNinja ..
ninja -j$(nproc)
Some compilation units require memory close to 1GB, so it’s recommended that you enable swap as explained below and be cautious about increasing the number of jobs when building (-j)
Executing these commands start the build process, which can take up to a couple hours, and
creates a file
called libmxnet.so in the build directory.
If you are getting build errors in which the compiler is being killed, it is likely that the compiler is running out of memory (especially if you are on Raspberry Pi 1, 2 or Zero, which have less than 1GB of RAM), this can often be rectified by increasing the swapfile size on the Pi by editing the file /etc/dphys-swapfile and changing the line CONF_SWAPSIZE=100 to CONF_SWAPSIZE=1024, then running:
sudo /etc/init.d/dphys-swapfile stop
sudo /etc/init.d/dphys-swapfile start
free -m # to verify the swapfile size has been increased
Step 2 Build cython modules (optional)
$ pip install Cython
$ make cython # You can set the python executable with `PYTHON` flag, e.g., make cython
PYTHON=python3
MXNet tries to use the cython modules unless the environment variable
MXNET_ENABLE_CYTHON is set to 0.
If loading the cython modules fails, the default behavior is falling back to ctypes without
any warning. To
raise an exception at the failure, set the environment variable MXNET_ENFORCE_CYTHON to
1. See
here for more details.
Step 3 Install MXNet Python Bindings
To install Python bindings run the following commands in the MXNet directory:
cd python
pip install --upgrade pip
pip install -e .
Note that the -e flag is optional. It is equivalent to --editable and means that if you
edit the source
files, these changes will be reflected in the package installed.
Alternatively you can create a whl package installable with pip with the following command:
ci/docker/runtime_functions.sh build_wheel python/ $(realpath build)You are now ready to run MXNet on your Raspberry Pi device. You can get started by following the tutorial on Real-time Object Detection with MXNet On The Raspberry Pi.
Note - Because the complete MXNet library takes up a significant amount of the Raspberry Pi’s limited RAM, when loading training data or large models into memory, you might have to turn off the GUI and terminate running processes to free RAM.
NVIDIA Jetson Devices
To install MXNet on a Jetson TX or Nano, please refer to the Jetson installation guide.